Monday, November 29, 2010

Logging those hours

Last year Vince convinced me that it would be a great idea to keep track of my training hours for this season and provided me with a great link to the google doc spreadsheet he uses to track his own hours / distances. At first I thought it would be arduous to keep up and I would eventually fall of the logging wagon, however being able to compare hours and distances with my fellow triathletes is a great motivator. Therefore as the end of 2010 rolls around I find myself cleaning up and updating my 2010 log making it ready for the 2011 season. I thought therefore this would be a good time to offer up a copy to any of those who would like to start logging in the current season, or who are still stuck in the dark ages of Excel logging. The color scheme can of course be change for those who loath the one I have selected, I do recommend differentiating the colours in the separate Swim / Run / Bike columns to easily see where your missing out in your training.

Excerpt from my 2010 "Workout Data" tab

The interface is fairly simple, simply log your distance and hours in the appropriate format in the main "Workouts Data" tab and that information is referenced through to the: Overall, Swim, Bike, and Run tabs. Information presented in these tabs such as the distance / time per week is a great way to chart your continuing progress. Having a lazy week? A low bar on a graph has more than once inspired me to hit that late night Sunday swim slot.

Excerpt from 2010 "Swim Graphs" Tab

The "PB's" or Personal Best's tab is a good way to track race and personal goal improvement over a single discipline. Similarly the "Races" tab allows you to analyze your races over the season without having to comb back through Champion Timing data. Gear information I really have yet to find a use for, but I hope to next year go through my gear and figure something out... Finally the "Current Totals" Tab was created to link to a blog as explained in this post.

Excerpt from 2010 "Overall" tab

So what are you waiting for? Make yourself a copy of the "Training Log 2011" and start logging in the new year!

Honda CB125S - Breaker points

Due to a cracked wiper ring kick starting the engine over a few weeks ago resulted in the removal of the complete head assembly yet again (At least i am getting very streamlined at the procedure now.) Reassembling the breaker points for the umpteenth time called for a more exact measure of checking the firing point.

Contact points plate diagram

An extended overview can of course be found on wikipedia, however the principle of operation is simple. As the rotation of the crank shaft drives the cam shaft at a 2:1 rotation conversion for the little 4 stroke engine the asymmetrical end of the camshaft lobe presses against the spring arm of the breaker causing it to on the compression stroke 'contact' the grounding point. At a set point ideally just prior to Top Dead Centre the pressure from the cam on the breaker arm is released causing the points to separate and the resulting sudden change in current across the inductor of the ignition coil induces a voltage spike v(t) = L(di/dt). This spike is large enough to break down the dielectric strength of the gas-air gas mixture and the gases become ionized allowing electrons to travel across the spark plug gap igniting the fuel mixture at ~500-800C.

The procedure Honda prescribes for determining plate rotation requires that a) you have the engine mounted on the bike b) you have a 6v test bulb.

Honda's Recommended breaker alignment procedure

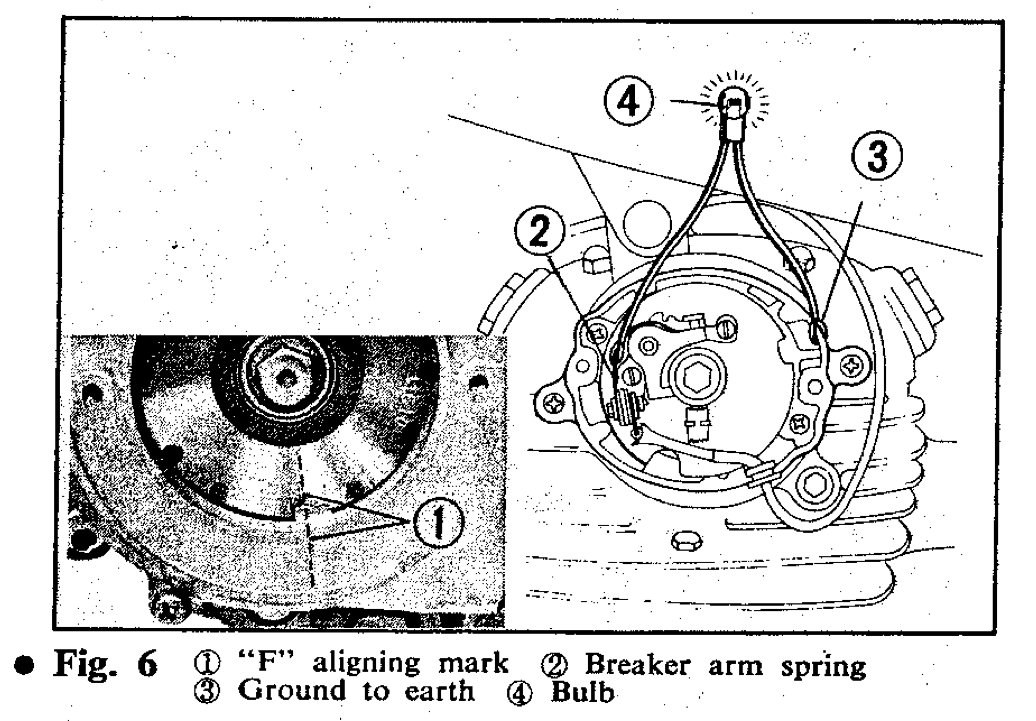
Unfortunately I have neither a, nor b so rather than hunt around for a multimeter it was far easier to modify the families emergency flashlight. Thankfully 4 years of labs left me with a wealth of spare wire and aligator grips, so in not time at all and using an excessive amount of packing tape I had come up with a rudimentary conductivity tester. Evidently the contact points are connected in the following picture as the bulb is illuminated.

Connection tester alligator clipped to breaker spring (red wire) and grounded to case (black)

To determine the separation point of the contacts the two adjustment screws on the contact plate must be loosened and the plate rotated such that the light on my conduction tester goes off when the F point on the crank shaft aligns with the index mark on the stator during the compression stroke. This is accomplished by rotating the crankshaft with a 14mm wrench until the F line and the index mark align, then using a flat head screw driver gently rotate the top plate CCW's until the bulb turns off. Once aligned tighten down the adjustment screws and check to see if the point is the same, I had to redo this a few times as the tightening causes the plate to shift. It was interesting to note that the pervious wear on the contact plate indicating where the plate had previously been tightened down was significantly off from the newly realized plate rotation. Perhaps this was the reason for wiper ring crack?

Crank plate (14mm bolt) with T (Top dead center) and F (Fire) marked

Sunday, October 3, 2010

1974 Honda CB125 - Completion

Soon hopefully I will get around to documenting the process that culminated in today success...


All that's missing is a sunset to ride off into!

Monday, September 6, 2010

Swim Touring - Part 1

There are many words that can be found before 'touring' in a google search: Bike, car, even camel. I mention this because usually when I want to try something that I've never done I turn to google to offer me some advice on how such a thing might best be accomplished. Unfortunately Google seems to have fallen short when it comes to adding 'swim' to 'touring' or in fact any permutation of phrases related to traveling long distances in water with gear. If google has never heard of it I'm pretty sure it's safe to say that what you are about to read about is an activity so revolutionary even the internet has not yet heard of it! 'Swim touring' can be thought of as the love child of canoe touring and distance swimming. The principle is simple: select a suitable loop involving land and water, throw on wetsuits and fins, strap your gear to a floatation device, and get paddling...

Preparation

Going on the hunch that canoe tourers had some pretty good ideas regarding water loops we hunted around the local area to find a suitable location for our inaugural foray into the sport (Activity?). Sure enough we soon came upon a number of older posts on a route known as The Nitinat triangle which sounded ideal for out purposes. Hunting through what information we could distill from various blogs and forums we plotted out what we felt was a suitable route that was short enough to swim, but long enough to get a quality adventure in. Our proposed route would take us from the Knob point campsite down Nitinate 'lake' about 4km where we could cross over land ~1km into Hobiton lake which we could then swim down to find the trail up to Hitchie lake to camp.


There are several unique challenges to swim touring some of which we guessed at prior to departure: keeping gear dry and afloat, towing something while swimming, and keeping relatively warm. Most of the critical gear (Sleeping bags, stove, food etc.) we managed to cram into my 30L SealLine bag. The remaining two backpacks were double packed into rather flimsy garbage bags with the hope that most of the water would be too lazy to penetrate through to our gear. Lacking an appropriately streamlined craft and wanting to ensure that our gear stayed as high and dry as possible we lashed our bags to the top of an inner tube. This was not the ideal solution as our gear developed a nasty habit of trying to abandon ship if we hit a particularly vertical patch of water, but it worked.


Keeping warm when your planning on jumping into a freezing cold lake is significantly more of a challenge; in the end we settled on a pair of shorty wetsuits that were flexible enough to hike & swim in while providing a measure of protection against the water. The idea being that once we had reached our destination we could strip down and huddle inside warm dry sleeping bags. Matching swim caps also prevented excessive thermal loss from our scalps while providing an incredibly streamlined profile in the water.


Not surprisingly there is very little information available on how to tow a tube through the water without having to hold onto it, consequently much of our preparation time was spend designing and then constructing swim harnesses. After a number of sketches and string based mockups we came up with a set of belts that could be easily removed in the event of a seal attack and that fastened together onto the inner tube (the emergency whistle was integral!)


Feeling very proud of our handy work we hitched up the tube and trotted around the lawn in a land based simulation. Whether due to the initial perfection of the design or the dissimilarities between grass and water we struggled to find anything wrong with our creation in the land trials.


Collecting together most of our gear we tossed everything into the tiny back yard pool for some 'sea' trials. It didn't take long to find an appropriate length for the tow rope connecting us and to discover that at the speed we were moving the tube offered surprisingly little resistance. So far the plan was coming along swimmingly! It could be argued that the three strokes across the pool were as effective as the BC ferries sea cat trials, though again they failed to identify any major flaw in our plan. Feeling very proud of ourselves we crammed all of our gear into the car and drifted off to sleep content in the knowledge that we were completely and undeniably prepared for the days ahead!

Next installment; The Adventure...

Thursday, August 26, 2010

Embedding Google Spreadsheet data into blog side bar

Frustrated with having to manually update my training data I spent more time than I would like to admit automating the process...

Step 1: Log in to your GoogleDoc Spreadsheet that you want to share. For my purposes I wanted to share only my totals so I created a new sheet and collated my overall training data to make it more visually appealing.


Step 2: Click the little down arrow beside the share button at the top right hand corner of the sheet and select "publish as a web page" from the drop down menu.

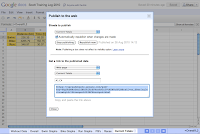
Step 3: Select the spread sheet that contains the data you want and click "Start publishing" Once that is done you should have a screen similar to the one shown in the picture above. Under the "Get a link to publish" header select "Webpage" , your sheets name, and the Cell range within the sheet that contains the data, in my case A1:C4.

Step 4: Highlight and copy the link that is generated, this will be used in the iframe parameters later.

Step 5: Log in to your blogger dashboard and access the design section of your blog.

Step 6: Click on the add gaget table in the location you would like to insert your spreadsheet. Select a "HTML/Javascript" gadget
Step 7: insert this HTML code with a '<' bracketing the iframe command on the first line (Note if this is added in bloggers composer it executes the framing command in the post hence why I have excluded it)...

iframe frameborder="0" marginwidth="0" marginheight="50" border="0" style="border:0;width:195px;height:108px;"
src="https://spreadsheets.google.com/pub?key=0ApUbbMKodwy1dHA5RjFyZFRxekN3a3VtN2NTcHFjMHc&hl=en_GB&single=true&gid=15&range=A1%3AC4&output=html"
scrolling="no" allowtransparency="true">

replacing the orange text with the html link you copied from your GoogleDoc spreadsheet. The red text can then be adjusted to fit the cells you desire. I would like to credit Viti-Vino. Le Blog de prac for this handy piece of html code.

EDIT 2012: Publish to web can now be accessed via the File menu

Friday, August 13, 2010

Loft Bed - Prologue

It may seem counterintuitive to do a prologue about a completed product, I can assure you however that that was a mere prototype of my coming masterpiece. Living in residence for 3 years had taught me to cherish space and to continually strive to find a better arrangement for my possessions, especially larger furniture. So moving into my new place I was determined to get it right!

Parts list

8-10 x [2" x 6" x 8' ] Pine planks, try to choose ones with minimal warp
1 x [2" x 4" x 8' ] Pine Plank
~60 x [3"] Galvanized screws
12 x [1/4" x 3 1/2"] bolts with matching nuts
24 x [1/4"] large diameter washers
1 x [ 1L ] Can wood primer / self priming paint etc

Notes: I am not too sure of the final number of 2"x6" planks used, though I can remember being one or two short. Similarly with screws since ~5/leg (4x) + 4/slat (6x) + 4/ frame end (4x) = ~60

Tools List

Miter Saw
Hand saw / reciprocating saw
Tape Measure
Square
Pencil
level
Cordless drill
Appropriate drill bit for screws (I happened to use square head)
1/4" Wood drill bit
Wrench set
Tile / solid flat surface
Sand paper [80 + 200 grit]
Paint brush

Process

The dimensions of the twin-long mattress I had came from About.com:Interior Decorating, cheesy I know. This meant I had to design a frame to comfortably fit a 39"x80" mattress. To make sure I wasn't going to run out of space I decided to construct a frame at an arbitrary 40"x82".

Components...

Step 1: Cut two of your 2x6" planks down to a length of 82" and notch the end with your hand saw as seen in the picture below.


Step 2: Cut two 40" long head pieces out of a single 2x6" board and notch as shown in the photo below.


Notes: The notching allowed the weight of the mattress to be distributed evenly across the bed rather than attempting to dovetail the two planks.

Step 3: Arrange the cut planks as shown in the following photo, make sure the beam (longer) rails sit atop the head rails (this is the opposite of what is show here)


Step 4: Cut down 3 of the 2x6" planks to form 6 ~37" mattress slats, it is helpful to measure here as bowing the the wood can require the slats to be slightly longer or shorter.

Step 5: Cut down 4 of the 2x6" planks to form 8 - 46" long leg components and round off one corner for aesthetic / safety reasons

Step 6: Cut down the 2x4" plank to form 2 - 36" ladder rungs.

Step 7: Now that all of your components have been cut to size it's time to prime / paint / coat them. I used Behr sealer no. 434 purely because I happened to have a can of it from a previous project; also the initial plan was to give it a more elaborate paint job. I think I gave them 2-3 coats since the wood seemed to soak up the primer like mad.


Assembly...

Step 1: Arrange the dried frame on a flat surface and pre drill two holes into the adjoining notches as seen in the photo below. Then fix together with screws. Repeat on all four corners.


Step 2: Insert the mattress slats as shown in the following photo and connect to the frame by pre drilling and then inserting two screws in each side.

Aside: While I never encountered a problem with loading it would be a very good idea to run a 2x4" Rail below the slats two support them as a unit.


Step 3: Align the leg pieces on your tile or flat surface as show below and affix each together with 5 evenly drilled screws. Repeat this procedure 4x. It is important to note here that with this method one dimension of your leg will be longer than the other. Therefore I recommend labeling your legs and determining which corner of the bed you want the to support and therefore which orientation to affix the leg posts together for maximum esthetic appeal!

[Combo photo of legs on tile and drilled]

Step 4: Attach pairs of legs to frame - This requires first drilling 1/4" bolt holes 40" up in the middle of each leg piece on both the beam and head board side. It is critical that these two holes are inline or one bolt will suffer excess loading. Next measure down on your legs 3" and scribe a line along that point, this will be the top of the frame. I discovered at this point that this much wood was rather heavy so the next part might require a friend / helpful chair. Propping the frame up at an angle against your friend/chair and align the top of the bed frame with your scribed line. Using your 1/4" bit and the hole you drilled through each leg as a pilot drill through the frame. Before your friend collapses insert the bolts through the recently drilled holes with a washer on each side and cinch down.


Step 5: With the legs still attached at the other side it becomes a lot easier to drill and mount the remaining two legs.

Step 6: Finally attaching the two ladder rungs can be done either with screws, or with bolts. After experimenting with both I found no structural difference in the short run. The two rungs are located at 1' and 2' respectively and are attached by holding the board in place while drilling a screw into one side and then rotating till level before drilling into the other side. HAving done this you can either remove the screws and pre-drill 1/4" bolt holes through both the rung and the bed leg or add 2 extra screws on each side for extra support.


Step 7: Heave your mattress on top of the bed

Testing...

Step 1: Construct a detailed testing criteria including, but not limited to:
  • Sleep on bed, both directions
  • Jump off/onto bed
  • Rock bed laterally and longitudinally
  • Load bed with extra mass
  • Take the bed out for a picnic
  • Frolic on bed
  • Disassemble and reassemble frame
Conclusions:
  1. 2x6" boards make for an incredibly stable/heavy frame
  2. Always use large diameter washers when bolting onto wood
  3. Screwing together corner pieces works well, however has low esthetic appeal
  4. End ladders form great lateral supports
  5. Rounding out legs top edges prevented many likely injuries
  6. Adding an inner rail to support bed slats would have been a good idea
  7. I don't roll around that much in the night
This was a great project to sink my teeth into and took about 48 hours most of which was spent waiting for primer to dry. Leaving my old place I entrusted this frame to a friend, and look forward to my next frame which promises to further push the envelope of loft bed design.

Coming soon: Loft bed - Part 1 (Design)

Additional photo's can be found on my Picasa Album, unfortunately blogger is proving inept at handling photo's at the moment so Hyperlinks are presented instead. Also if you are considering replicating this design I should warn you that I am in no way a professional wood worker, and provide this for interests sake alone.

Monday, August 9, 2010

Thetis Lake 5K Swim for MS


I think that somewhere along the line I forgot that I can't do things. I don't mean of course that I feel I could be a surgeon or scale Mt Everest any time soon, but there is little distinction in my mind between say biking 10km or biking 100km. As with all challenging endeavors the original motivation amounts to nothing standing at the edge of a lukewarm lake at 8am in the morning. Ahead of us the course marshel is going over the buoy placement as I tug an ill fitting swim cap over my GPS. Did I start the darn thing this time? Water creeps up my bare calves as I wade in with the small huddle of people lining the lake shore. The realisation that this is the last I will feel of terra firma for a while is slowly infiltrating my still dozing brain. Goggles are on; did I spit in them? Considering for a second what I was about to do I accepted that I was woefully under prepared. A whistle blows somewhere behind us and the front wave of athletes dashes further into the now roiling waters. Behind them I take my time, it's easy to not be competitive when you know your not going to win!


But I digress; several months prior to this point my girlfriend had mentioned a 3k swim race she had just registered in, idly mentioning that there was also a 5k option. Unfortunately for both of us my brain quickly made the following three connections: 5k > 3k, if she can do it so can I, and the ever fatal "how hard can it be?" So as she counted down the days to the event, keeping up her time in the pool I wisely devoted my time to biking. Now before you leap to condem this training strategy one must realize that these two events have something in common chiefly 'doing the same thing for a really long time!' So mental training [check] physical training [not so much]. In a last ditch effort, more to prove to myself that I wouldn't drown I paddled up and down Jerico beach at sunset avoiding several pods of people and an aggressive kayak. All there was to do now was to try and add a few pounds of blubber before the race for extra buoyancy!


The course itself as I discovered was 3 1.5k loops + a mini 500m bonus lap around the perimeter of the lake. While usually I begrudge looped swim courses as the aquatic equivalent of track running the scenery that surrounded the course was more than enough to distract me from the monotony. Sighting out towards the end of the lake revealed shear granite walls plunge down into the murky depths all the while you inch closer to the forested island at the centre of the lake. Rounding this untouched wilderness gem isolated as it is from the world by a channel only perhaps a dozen meters wide causes your head to linger above the surface trying to probe the depths of such an enchanted grove.


Two laps down 3500m, this feels good! Rounding the buoy by the beach for the final time I am sure now that i'm going to finish. The girlfriend is continuing to inch away a hundred of so meters ahead, somewhere in the back of my mind I assume I can still out sprint her. This feeling of euphoria lasts about 700m. As I kick to steer around the first marker buoy I feel my calf twitch. Ignoring it I push on towards a pair of girls I can see ahead of me. Urk! The pain rockets up my leg, my muscles snap shut like a sprung trap. Glancing hurriedly around for a boat I spot none; strange I was sure one had been tailing me for the last lap? Perhaps a premonition. Treading water with my hands I will my legs to lossen, deep breathing! All I can do is watch as my prey splashes away around the back side of the island. It's working, my calf groans as a I straighten my leg out. Every kick is another opportunity for it to cramp again, why did this have to happen now? Rounding the island for the last time though erased my pain, up ahead the finish line gleamed in the crisp dawn light. Nearing the finish line a wet suited racer from an earlier race motored past me; digging deep into my reserves and gave chase, the next thing I know my palms are slapping against the ground. Doing my best to stay vertical I lurch towards the finish line my blood experiencing a near 90 degree shift. Looking up at the timer I grin 1:33:20 minutes of front crawl and 36 seconds of treading water and i'm done!

I urge anyone considering doing a swim race next year to check out the HtO Thetis Lake Swim for MS; impeccably run, fantastic course, and wonderful volunteers!